Vending Machine Configurations
Configuration > Point of Service > Vending Machine Configurations
Vending Machine Configurations are used to set options for vending devices. Note: Vending Machine requires a separate license other than the POS. This will need to be purchased before setup to continue with configuration.
-
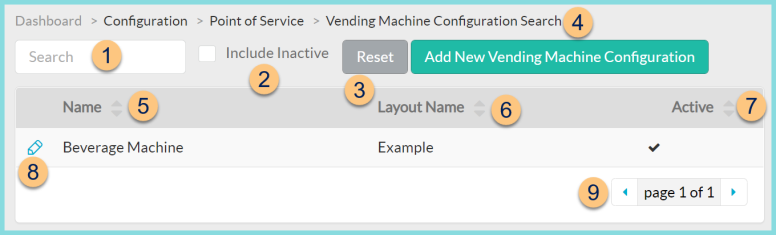
Search - search by name
-
Include Inactive - check to include inactivated Nutrient Standards
-
Reset - click to reset search parameters
-
Add New Vending Machine Configuration - click to add a new vending machine configuration
-
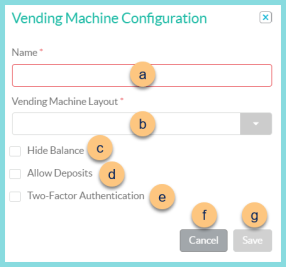
Name - enter a name
-
Vending Machine Layout - select device layout
-
Hide Balance - check to NOT show the person's balance on the vending machine screen
-
Allow Deposits - check to allow funds to be deposited to the prepaid account via the vending machine
-
Two-Factor Authentication - check to require two authentication factors to complete a vending purchase. First Step = Student ID. Second Step - select POS ID or Date of Birth.
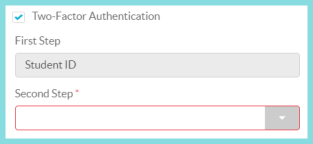
Note: If the POS ID or Date of Birth is not available in the district for that student, TITAN sends a randomized number to VendNovation. The vending machine will ask the student for this number, but they will not know it. The student will need to see the office for them to update their student information.
-
Cancel - click to return to the previous screen without saving changes
-
Save - click to save changes
-
-
Name - sort by name
-
Layout Name - click to sort by Layout Name
-
Active - click to sort by active status
-
Pencil - click to edit vending machine configuration
-
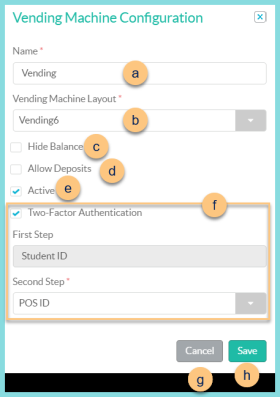
Name - enter a name
-
Vending Machine Layout - select device layout
-
Hide Balance - check to NOT show the person's balance on the vending machine screen
-
Allow Deposits - check to allow cash to be deposited to the prepaid account via the vending machine. CREDIT CARD DEPOSITS NOT ACCEPTED.
-
Two-Factor Authentication - check to require two authentication factors to complete a vending purchase. First Step = Student ID. Second Step - select POS ID or Date of Birth.
Note: If the POS ID or Date of Birth is not available in the district for that student, TITAN sends a randomized number to VendNovation. The vending machine will ask the student for this number, but they will not know it. The student will need to see the office for them to update their student information.
-
Active - toggle active status
-
Cancel - click to return to the previous screen without saving changes
-
Save - click to save changes
-
-
< > - click to scroll through pages